While I was out getting the latest White Dwarf, I ended up picking up one of the new Demon Prince kits! I'm pretty excited to bolster my black legion with this bad-boy. I know I'm giving him wings, but I'm not sure how else I want to model him. Do I go hardcore 40k parts or do I make him more fantasy? Any ideas?
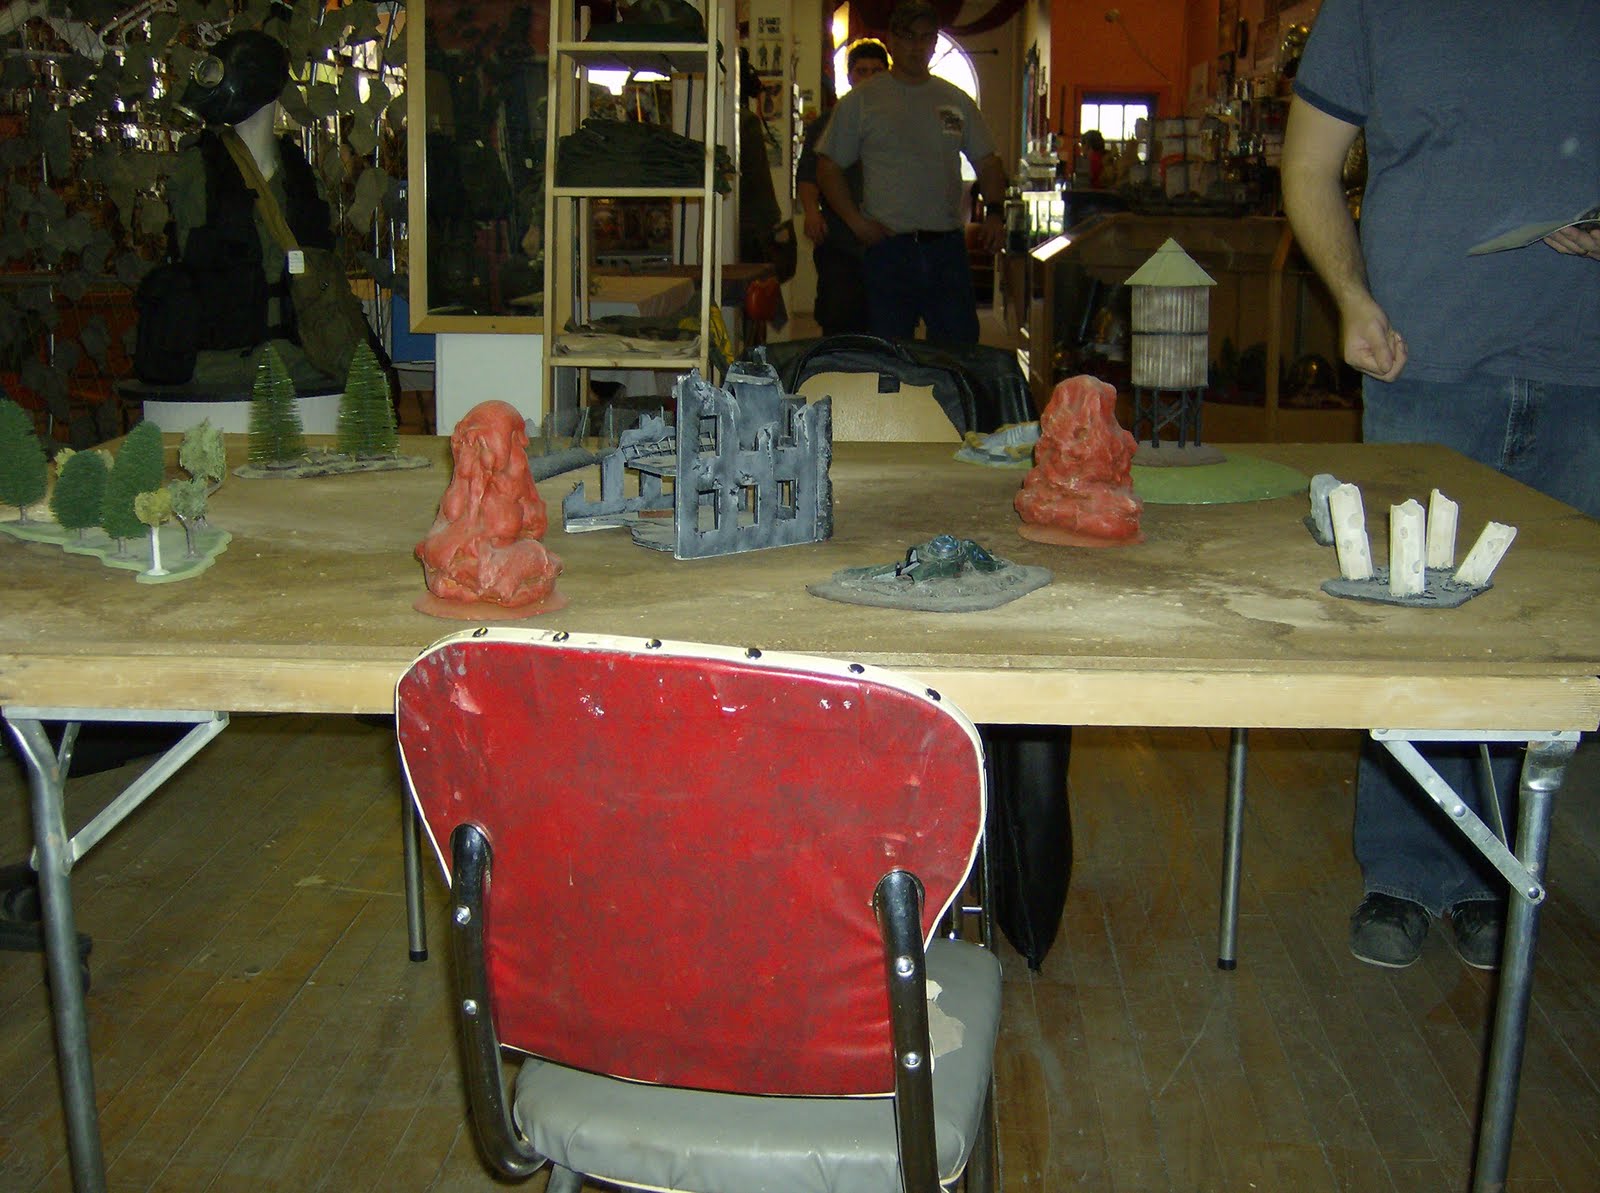
Of late I've listened to some podcasts that brought up terrain as a topic. It sounds as if there are pretty big regional differences as to the rules people use with terrain and just how much they are putting on the table. It sounds like (at least in the US) tables are pretty sparse for terrain or people use house rules as to how a terrain piece works (ie: for purposes of line of sight and cover saves). My basic approach has been simple: follow the rulebook. It has clear rules as to how each common piece of terrain works for cover and movement purposes and when it comes to line of sight, well, true line of sight. Take a gander. Use your eyeballs and a laser pointer. I think the rules are very clear on how this works. If people think it's too grey area then they are either doing it wrong or being poor sports. Further to this, the rulebook states that the table should not only have about a 1/4 of it covered, but that it should be a mixture of area, short, tall, and line of sight blocking terrain. In my experience the best tables for balanced and tactical gameplay follow these rules. A lot of pictures I see around the web of game tables (notably tourney tables) are either far too sparse, or feature short terrain or terrain that doesn't block LOS. Try it according to the rulebook and you'll find it to be a better game.
I wonder how much of the above is due to people remembering previous editions or just local flavour that came out of a misinterpretation of the rulebook?
Tuesday, August 31, 2010
Wednesday, August 25, 2010
Back to Hobby
I've finally managed to find a happy balance between newborn and hobby and am back to making some progress. I'm putting the finishing touches on my second broadside and another fireknife team so that they are ready for priming. Just a little more green stuff work on the fireknife team leader and I'll be able to get started on some painting.
Monday, August 9, 2010
Hobby slow down.

Hobby will slow down, but for good reason. I created something even more awesome. Her name is Ava, and she is incredible :).
Thursday, July 22, 2010
Hobby update
Man. My School Systems spring course has been eating up my time, almost forgot about blogging.
A bit of an update.
I played the last game of this step of our 1000 point escalation league and came out with a win. It looked close for some time, but I managed to come out on top. Terminators are frightening, plasma rifles are terrific.
Construction wise I've managed to finish off building everything that I have left to bump my army up to the 1750/1800 range. I've also painted up another squad of firewarriors and a stealth suit with a fusion blaster. A bit of a wasted excersise when Kroot are my infantry of choice and I'm still on the fence about stealth suits, but my eyes have been bleeding from painting so many battlesuits that I needed a break.
For my 1250 step of the league, I'm looking to drop a devilfish, drop the shield drones on my HQ and take a pair of broadsides, another crisis suit and a stealth suit team. I'll post the list up shortly.
Army sizes:
I've heard lots of talk thrown out about army size. The north american standard is 2000 points, while Europe favours 1500. Still not convinced what I'd like to play. What I do know is that the game is playtested at the 1500 level, which means it's likely most balanced at that level. 2000 points does let you bring more toys - especially for an elite army like space marines, but vehicle spam, or unit spam in general becomes more prevelant at those levels. Honestly I think it's going to come down to some experience playing at both levels before I find a happy medium I suppose.
I've been keen on getting my orcs and goblins put together to try out the 8th edition fantasy that just hit. I think I'll just slap on a basic paint job to make it happen, just one highlight and shade maybe for now. I can't possibly go crazy like I do on some of my 40k models.
My child will be born in the next few weeks. That's exciting :). Wonder how it will affect hobby.
Monday, July 5, 2010
Army update
It's been a while since I have posted anything related to hobby on my blog, so I thought I'd share my latest addition to my Tau force. It's the first of a pair of XV88 broadside battlesuits. I'm hoping that they will help put a nice dent in enemy heavy armour. We shall see.
Also in the works is some more XV8 battlesuits, a Deathrain (Twin-Linked missile pods) and a Fireknife squad (missile pod, plasma, multi-tracker), but only the deathrain is near completion. I'm finding painting battlesuits to be a bit tedious lately though, so I've also been working on getting some more fire warriors painted. While I don't see myself making use of more than I have in the army at the moment, it gives me some flexibility try out some different types of armies.
I hope to pick up some more Kroot soon as well, but that can wait.
XV88 - Front

Side

Rear

Monday, June 28, 2010
Tau vs. Guard (League Match 3)

I had a terrific match with my Tau against a Guard army for the third round of our 1000 pt level of the escalation league. That was probably a run on sentence... oh well. Anyways. It was a really close game, but ultimately my opponent won the game in the last tense turns of the game. It was one of the best games of 40k I've played so far. I always find the close ones tend to be the best ones, no matter who takes it.
I played the 1000 pts league list posted a good while ago (of course).
My opponent ran two guard squads on foot, some officers, a pair of Russ, a pair of Hydra flak tanks, and a Chimera withe melta vets.
Spearhead Deployment, Capture and Control. While I had greater mobility, the location+number of objectives took away some of that advantage. While I had better guns, he simply had more of them, meaning I couldn't sit back and outshoot him either. In the end I chose to put pressure on his scoring units, ignoring his Russ tanks for the duration of the game.
Deployment:
I chose to go first after winning a roll-off. I held my Kroot to outflank, deployed my Pathfinders in some ruins for cover, and used their scout move to get them to a window overlooking most of the field. My devilfish deployed so as to move up either side of a central ruin and harass his infantry out in the open, and the hammerhead deployed centre table, to redeploy quickly where needed. The suits were the hard choice. Ultimately I placed them centre, when I should have anchored a flank to give them a bit more cover to work with. My lone deathrain suit covered my weaker flank.
My opponent deployed fairly centre due to the danger of outflanking Kroot, and placed his tanks on his flanks.
Turn 1
My opponent forgot to seize the initative, I had already made my moves for my movement phase when he remembered. From now on I'll sportsmanlike remind my opponent. Turn 1's shooting was lacklustre on both sides. My Deathrain penetrated the Chimera sneaking up the flank, but I rolled a 1 on the table. The hammerhead and 'fish caused a few casualties on foot guard with markerlight support, but scatter reduced the potential of the railgun submunition. My opponents retaliation was better - his flak tanks got 4 penetrating hits on my Phirana, and the cover only saved 2 of them. One devilfish was immobilized It was wrecked. My opponent moved up my flank with his Chimera
The Kroot showed up and moved into some ruins near my opponent's objective. I dismounted the fire warriors from the immobilized fish and moved them into some ruins. My other fish and Hammerhead moved into better firing positions and cleared one guard squad out with markerlight support. My Fireknife squad barraged the Hydra squadron, destroying one and stunning the other, while taking cover in ruins. My opponents sentinels arrived from reserves on my flanks and took out my deathrain, but did little else. My Fireknife squad held their ground in their ruins despite battlecannon shots, and a Marbo satchel charge, but my dismounted firewarriors broke from concentrated fire and ran.
The Kroot continued their advance through the ruins, the wrecked Pirahna's drones stunned a sentinel, while my suits and tanks pounded foot guard, killing most of another squad, but failing to make them break. My fireknife squad began taking casualties, but stayed in the fight.
The pressure on my opponent's flank continued, my Kroot moved too far into the open and got pounded by mortars and artillery, causing them to break. My suits continued hammering his infantry, killing another bunch, while the hammerhead moved back a bit to deal with the incoming Chimera vets.
At the bottom of Turn 5 the battlefield looked pretty sparse. Burning hulls, scores of dead infantry, battlesuits thinned out, Kroot running off the table. It was great! All that was left to threaten was a Firewarrior squad mounted in a 'fish on my opponent's objective, being contested by a Hydra, while my opponent still had his Chimera vets. Dramatically, I had failed to destroy his Chimera with a railgun slug, rolling a 1, remarkably, his Chimera got stuck trying to drive through the crater left by a destroyed devilfish. Nailbiting! It was Turn 5, a draw thus far, but the roll was made and the game continued! The Hammerhead fired once more, killing many guard, but failing to make them break, they advanced onto the objective. The hammerhead was hit by a battlecannon in the side, failed it's disruption pod save, and was wrecked! With nothing left near enough to contest, it was the end of a game.
Overall - terrific game as you've gathered by now. I thoroughly enjoyed myself. It looked like I had it in hand for a good part of the game (at least from my point of view :D). I made some mistakes in the last few turns that cost me though! I should have recognized the danger of the Chimera sooner and moved units to support it sooner, likewise, I could have used drones and my Devilfish hull in a way to prevent having the objective I held from getting contested. Still, it was anyones game up to the very end, which makes for good Warhammer.
A few pictures!


Monday, June 21, 2010
The Black Legion Swells!
Yes, my chaos army has grown a bit. I finally got around to putting together my land raider and it's looking fairly sharp. I must say I didn't have much of a concept of just how BIG these things are. It makes my old 3rd ed predator look like a baby tank next to it. I've also put together a nice sized Chaos Terminator squad. I picked up a Chaos Terminator Lord box and a box of Chaos Termies. While those boxes give me 6 termies to work with, I was able to put together a solid 8 terminators by using the extra arms, heads and bits in conjunction with some of my loyalist terminators that are collecting dust. Slowly, my loyalist models are turning to the lure of Chaos! I have enough bits still to throw together another 1 or 2 termies yet. I'll post up pictures when I get my camera back.
I played a battle missions game today and tried the terminators out. They worked out well enough, but the mission type forced them to run without the terminator lord and weakened them somewhat. I feel that, overall, they'll perform better when I throw them in a Land Raider in a higher point game to get them into assault a bit more quickly.
In the realm of my main army, the Tau, I've put together my second hammerhead and built up another Crisis suit squad as well as a pair of broadsides. These additions will make their way into my army marching up to 1750 points. In the meantime, I've been busy trying to paint up the extra suits I'll need in the jump to 1250/1500. While I feel confident at getting what I need done for 1250 in time for the next step in our escalation league, I may have to substitute some stealth suits in place of the additional crisis suits I want. I'm still waiting for an order from GW, and it takes a while to paint these big guys. In the meantime, I do have stealth suits painted and ready to go, though I don't think they'll give my army what it needs at that level, I'm canny enough to make things work.
Playing another friendly game with my chaos tomorrow, but on Saturday my Tau are out for their third league matchup. Report with pictures should be up on Sunday or Monday.
Tuesday, June 8, 2010
Strategies
To keep things easy to check up on, I created another page for any useful tips or strategies that I have to offer. I moved my first post on this (from a few days ago) over there and will add to it as I go on. You can click on the links on the right hand page.
I am also considering moving my battle reports into there, to keep things a bit more organized.
I am also considering moving my battle reports into there, to keep things a bit more organized.
Tourney Round 2!
Exciting match. Here's a battle report written by my worthy opponent. Enjoy:
The Tau deployed almost the entirety of his army in his corner. His Kroot infiltrated.
The Guard deployed a lone Chimera on the battlefield. The HQ inside the Chimera was frantic to relay instructions to the rest of the Guard army, which was outflanking.
Turn 1: The tau reach across the board and unleash upon the lone Chimera. The transport was shaken, unable to move or act. The tau closed, with the kroot circling from one side, and the Piranha coming in towards the Chimera from the other.
Scared witless by the incoming force, the HQ bailed from the Chimera and ran away, into nearby bushes, where they bunkered down.
Turn 2: The empty Chimera was destroyed. The kroot closed in on the cowering HQ. The rest of the tau force drifted towards the middle in preparation for the incoming Guard counter.
That force came. The Lone Commando, one Valk (with melta vets inside), one Chimera (with the Gunnery Sgt and plasma vets), and two autocannon Scout Sentinels appeared on the tau's short edge. Melta-vets deployed from the Valk and crippled a tau transport. A few Crisis-Suits were frazzled by autocannon shots. But the HQ sallied from their hiding spot, and charged the Pirhana that was previously hunting them, and detonated the lone craft. Also, the Lone Commando detonated his explosives pack, destroying the shield drones that accompanied the Crisis-Suits.
Turn 3: The tau addressed the ambushing Guard force. One Scout Sentinel was destroyed, the other badly wounded. The Hammerhead devestated the melta-vet squad. The Lone Commando was obliderated from concentrated fire. The Valk was stunned. The kroot stalking the Guard HQ pounced and slew the humans, taking only minimal losses. They would later consolidate onto the forested objective.
The second Valk appeared, and threw its second melta-vet squad at the tau Hammerhead, destroying it before flying off and doing minimal damage to some tau Fire Warriors. The other Valk (stunned) flew circles around the tau, confusing them with some high-speed passes.
Turn 4: The kroot stayed on the forested objective. The other tau stunned the Valks, and destroyed the second melta-vet squad.
The plasma-vets inside the Chimera ended up clearing the tau transport from the choke point, but taking casualities from the explosion. The Valks continued to do futuristic fly-bys.
Turn 5: The plasma-vets were obliterated. The remaining tau tried bringing down the remaining Sentinel and Valks down, but to no affect.
Currently, the Guard don't have any infantry left. The tau are holding three objectives - one with the kroot in the forest in the Guard's corner; one objective in the centre, held by Fire Warriors in a transport. And another objective held by a damaged, dismounted Fire Warrior unit in the tau's corner.
One Valk attempts to chase the kroot off the forested objective, with minimal result. However, concentrated fire from the remaining Chimera chases the Fire Warriors off the objective in the tau's corner. The second Valk attempts to hurt the tau gathered in the centre, to no effect.
Turn 6: The tau consolidate in the centre, attempting to block Guard forces from contesting the objective with their positioning. They frazzle the Valks, even managed to destroy a weapon's pod, but otherwise leave them unharmed.
One Valk looms over the kroot on the forested objective, contesting it. The second Valk manages to steal between several tau units from an unexpected angle, contesting the centre objective. The tau that held the objective in the tau's corner are wisely retreating.
The game ends in a draw. A pyyric draw.
Wednesday, June 2, 2010
Weekly games roundup.

My group had our regular monthly meet, and it was a blast!
I had my first match of our 1000 pt level of our escalation tourney against a pretty tough nut to crack in the form of Orion's scout marine army. It was an annihilation mission and he had all of 4 kill points to give up compared to my 15, so I had to basically wipe out his army. He had 2 10 man scout squads and a 10 man terminator squad! That's right, 10 terminators! My army proved up to the task though and was able to clear the table. It was very near to a draw though by the last turn. My new list is running like a well oiled machine and the extra mobility and killing power of the Crisis suits is really working out. We'll see how I do against the guard in my next matchup. Battle report with pictures soon.
Played another game with my Chaos today, this time at the 1250 point level. I basically took the list from my last matchup and tweaked it. Here's how it looked.
Chaos Lord, Wings, Mark of Slaneesh, Daemon Weapon
Troops
10x Chaos Marines, 2x melta gun, Icon of Chaos ...whatever, the cheap one
- Rhino, Twin Linked Bolter
8x Khorne Beserkers /w skull champ and power fist
- Rhino, Extra Armour, twin linked bolter
6x Lesser Demons
6x Lesser Demons
Fast attack
5x Raptors /w champion and power sword. Icon of Slaneesh
Heavy Support
Pred /w lascannon sponsons
1x Obliterator
1x Obliterator
The lord rolled with the raptors.
We played the suprise attack scenario out of space marines section of the battle missions book.
It went well for me. I was the defender and deployed, well, defensively. My raptors and oblits took cover in the middle of the board, while my rhino mounted squads covered each side of the board. The predator deployed in a position with good fire lanes and cover for its rear armour.
Everything went according to my plan, I left the Khorne Rhino in a position to be hit by my opponent's assault marines, it was cracked open leaving the 'zerkers in a position to counter-assault the next turn. The raptors preyed on small combat squads and chopped them up, the Lord's daemon weapon rebelled once, but for the rest of the game it was dealing deadly bliss. I put the squad in there to be some fast moving anti-tank, and to deal with straggler depleted squads and it did just that, it handled small squads handily. Other than that, not much to report. Everything unfolded as I wanted and I manage to wipe out the other army. Though the army has worked well so far, I'm not sure it would fare well against a shooty army or lots of bodies. Hard to say, I think I'd need some flamers or a battle cannon in there to be a bit more threatening in that regard.
Monday, May 24, 2010
My first fight with Chaos
That is, my first fight using Chaos, rather than with Chaos. I hope I've confused you!
It was a 1000 point game, using the
My list looked something like this:
HQ
Chaos Lord, Power Fist, Mark of Khorne, Personal Icon, Combi-melta
Troops
10x Chaos Marines, 2x melta gun, Icon of Khorne, Aspiring Champ /w power sword
- Rhino, Extra Armour
7x Khorne Beserkers
- Rhino, Extra Armour
6x Lesser Demons
6x Lesser Demons
Heavy Support
Pred /w sponsons
1x Obliterator
1x Obliterator
Not too sure what my opponent took.
It was something like this:
10x marines - lascannon/flamer - meltabombs, power sword
10x assault marines - meltabombs
10x scouts - Telion, Heavy Bolter, Sniper rifles, stealth cloaks
Whirlwind
Dreadnought with extra armour and plasma cannon
My HQ stuck with the Khorne Beserkers. The matchup was one of the battle mission games, nothing too special. It was objective based, I ended up getting an advantage where one turn I could give my guys furious charge and rage. It helped and hindered me during this game.
Overall, terrific game. Ended in a bloody draw - my opponent had four models left on the table at the end, but I had few more.
The lesser demons performed better than expected. A lot of people seem to knock them, but I found that their ability to deep strike accurately and pin down enemy units valuable. They solve the problem of getting guys into assault after they disembark from a rhino. the suprise factor is terrific as well. The ability to assault the turn they show up is awesome. Sure, you can get a marine for 3 points more, but the added synergy is worth it. It helps that they can hold objectives too! I'll certainly use them again.
Overall, very different experience than playing Tau. I could play much more aggressively and not be scared about getting close. I find the Tau a lot trickier to play that's for sure.
Looking forward to playing some more, I'll be sure to post a report next time.
Thursday, May 20, 2010
A taste of my army.

Took some pictures today of my army. Still some elements that need to be finished up - my HQ, some drones, a little detail work on the hammerhead and some basing, but it's basically done.
Pardon the poor quality of pictures.
Crisis!


The Patherfinders leaping into action.

I'm proud of my Kroot, note my alternate hound models. I had to greenstuff the horn holes on these hounds and model some more fur.

Saturday, May 8, 2010
1000 pt Tau tourney list

HQ
XV8 Shas'el /w missile pod, plasma rifle, multi-tracker, Hard - wired Drone Controller, 2x Shield Drone and
Bonding Knife
Elites
2x XV8 Shas'ui /w missile pod, plasma rifle and multi-tracker
1x XV8 Shas'ui /w twin linked missile pod, flamer
Troops
6x Fire Warrior Shas'la /w pulse rifle
6x Fire Warrior Shas'la /w pulse rifle
- Devilfish /w burst cannon, 2x gun drone, landing gear, disruption pod and multi-tracker
10x Kroot /w kroot rifles
4x Kroot Hound /w fangs
Fast Attack
5 x Pathfinder Shas'la /w pulse carbine and markerlight
- Devilfish /w burst cannon, 2x gun drone, landing gear, disruption pod and multi-tracker
1x Piranha /w fusion blaster, 2x gun drones, disruption pod and targeting array
Heavy Support
1x Hammerhead /w railgun, 2x burst cannon, landing gear, targeting array, disruption pod, multi-tracker and black-sun filter.
Hopefully I'll have better luck than last time. The list plays well though, plenty of long range fire power, the vehicles have much more mobility with multi-trackers and lots of killing power from the added suits.
Monday, May 3, 2010
Showin' off the Chaos

Test played my 1000pt Tau list recently and it played well. I didn't realize just how vicious battlesuits could be until this game. The addition of suits combined with the multi-trackers adding vehicle mobility allowed me to play very aggressively. It helps that the railgun didn't miss all that much this go round.
Not much else to say right now. Spending more time on Hobby! Updates coming soon.
Sunday, April 25, 2010
New Army
Our 750 point tourney had a nice finish, with a fairly explosive large scale 3 on 3 game, xenos vs imperials. More on that can be found at one of my friend's blogs at : http://irolld6s.wordpress.com/
I find myself too lazy/busy to comment myself on the happenings. Check it out though.
For our next tourney, my 1000 point list will look something like this:
HQ
XV8 Shas'el - Cyclic Ion Blaster, Plasma Rifle, Targeting Array, Hard-wired Multi-Tracker, Hard wired Drone Controller, Shield Dronex2, Bonding Knife
Elites:
1x Deathrain - TL Missile pods, flamer
1x Deathrain - same as above
1x XV8 - Fusion Blaster, Plasma Rifle, Multi-Tracker (to attach to HQ)
Troops:
6x Firewarrior
1x Devilfish - Multitracker, Disruption pods
10x Kroot, 4x Kroot Hounds
6x firewarrior
Fast Attack:
5x pathfinder
1x devilfish - Multitracker, Disruption pods
1x Piranha - Fusion Blaster, Disruption pods, targetting array
Heavy Support:
1x Railhead /w Disruption pods+multitracker
From my previous list I've added some battlesuits, another devilfish and added multi-trackers to my vehicles to make them more mobile. The Deathrain Crisis suits should be adequate to take on AV12 and lower, freeing up my railgun and fusion blasters for the messy business of any heavy armour that might be on the table, or letting my Railhead lob submunitions the whole game. The second plasma wielding suit should be running around with my commander to take on those pesky space marines and terminators, though the odd game he may be tasked to deal with armour instead. The more I play, the more I feel that the Tau codex is lacking. While there are a great many good options in the list, all of the stuff that makes the army work is tied up on expensive models. That is to say, while many armies can do a lot more with their basic troops, be it to give them weapons to deal with armour or infantry, there is a massive amount of STR 5 guns on just about every Tau unit. While this normally wouldn't be a problem in most armies, the fact that the Tau just can't assault compounds the problem. I could probably keep going on about what I don't like about the army, but there is much more that I do like which keeps me playing it. The thing is that I *like* the challenge that playing the army presents. It takes a lot of finesse and planning to play them well. The army has a very small margin of error.
At any rate, I digress. What I wanted to talk about was that I've started a project on the side. The Tau are coming along nicely and all that's left to paint up for my planned 1750 list is a bunch of Crisis and broadside suits and a tank chassis. These shouldn't take too long to take care of. Short of a few models, I'm 85% ready for the 1000 point tourney - I just have 1 crisis suit and 4 Kroot hounds to paint up, while finishing some of my bases of my old list. My love for the hobby is such that I felt like building another army - Chaos Space Marines. Now while, I feel that the Space Marine Codex is superior, there are a few of these armies already running around in my group. On top of that I have a love for painting and modeling that matches that of playing, and the Chaos Marines are just dripping with detail and modeling options. At first I thought I could just grab a bunch of my loyalist marines that are already built, but realized that the excess of imperial eagles, purity seals and so on makes it a more difficult task than I had initially thought.
So here is what I did: I bought a Chaos battleforce. That gave me 15 Chaos marines, 8 Khorne Beserkers, a Rhino and 5 Possessed to play with. Since I don't plan on running possessed, these parts will be used to modify aspiring champs, build chaos lords etc. While I couldn't use all of my loyalist marines as I wanted, I can and did save some. I'm using extra bits from my Chaos Rhino to pimp out a razorback kit that I haven't put together (the turrets will probably end up being used in terrain, or saved for another project. I also have some spare lascannon bits, and a couple missile launcher marines that, with some conversion, have been made into some havocs.
At any rate, this puts me up to a total of - 18 chaos space marines, 8 beserkers, 2 rhinos, 1 lord. So far.
Tenatively I'll practice with this list:
HQ - Lord /w Daemon weapon and mark of slaneesh
Troops:
9x Marines /w 2x melta and aspiring champ (the lord will run with these boys)
- Rhino/tl bolter
9x Khorne Berserkers /w Skull Champ /w powerfist
- Rhino /w extra armour /combi bolter/flamer
Heavy Support:
Havocs x5 /w 2 missile launchers and icon of chaos glory
Not a very competitive list, but I can use what I have to make it. It shouldn't be too awful at any rate.
Sunday, April 11, 2010
Clash! Sac'ea Tau vs Red Talon Space Marines (750 pts).

Had a heck of a game today, really close one too. I had a lot of anticipation going into this game, having wanted to play against this particular opponent for some time. The last turn came down to some lucky dice rolls. Here's a synopsis.
Pre-Game.
The game was a Seize Ground with 4 objectives. We set up the table: A ruined chemical factory, surrounded by toxic waste, drums and the remnants of a bunker. Forest was beginning to creep back into the area. The Sac'ea Tau, having taken casualties from the Imperial Guard and Eldar were attempting to secure fuel to retreat the remnants of the cadre off-world when they encountered the Red Talon Marines, out to spill Xenos blood. Kallisto had become too costly for the Tau to continue the campaign any further, but if they wanted to escape this hell-hole, they had to take the fight to the Red Talons.
The Chemical Factory:
I rolled my secret objective - keep my commander alive. After deploying objectives, we rolled for the deployment type - Pitched Battle. We rolled off, my opponent won the roll and chose to allow me to go first. I chose the table quarter that was forested, forcing my opponent in the ruins and the crashed space craft seen on the right in the above photo. I deployed in a defensive formation, setting up to advance with my Devilfish, Piranha and suits. I opted to infiltrate my Kroot across the table on top of the objective in the forest. My opponent deployed his marines and rhinos in a standard set-up, ready to advance on my position. My opponent failed to sieze the initiative.
My defensive position, behind the ruined fence. Firewarrior team Alpha, supported by Pathfinder team Echo.

Kroot holding their forest.

My opponent's objective, held by a supporting Marine squad:

Turn 1
Scattered shooting from both sides. My first turn was quite successful - my Monat XV8's missile pods wrecked my opponent's Rhino that carried his HQ. The marine's return fire was ineffective. His HQ squad advanced while his other rhino advanced towards one of the objectives and popped smoke.
My XV8's advanced, Pathfinder team Echo's Devilfish picked up Firewarrior team Bravo and advanced with the Piranha towards the chemical factory.
Pirahna

Turn 2
My XV8's continued their advance, Commander Bold Spear began using the chemical factory as a position to leap out from to barrage the marines, while the Monat XV8 made similar use of an old chemical drum. The Devilfish advanced with the Pirahna, while the hammerhead continued bombarding the marines from afar. Few marines fell, however the XV8 Monat's missile pods struck again, causing the second Rhino to explode, despite its smokescreen. The explosion claimed one marine, while the others went to ground, pinned for my opponent's turn. My opponent's retaliatory fire caused my Piranha's crew to become shaken.
View from the end of turn 2

The advancing skimmers

The Hammerhead takes position to aim it's burst cannons towards the expected deep-striking terminators:

Menacing! The Railgun must be warped though, throughout the Kallisto campaign the gun proved ineffective. The Earth Caste will have to refit Hammerhead gunship "Prosper" once off-world. A veteran of three campaigns, "Prosper" needs extensive refit and maintenance.

Turn 3
In turn 3 I continued my aggressive push, the Devilfish and Piranha layed down fire on the marines, while my suits peppered the squads advancing on the objective in the open. Return from the marines caused no casualties.
Turn 4
The terminators finally arrived at the end of turn 4, killing half of Firewarrior team Alpha in their opening salvo. Ouch. I continued pressure on the second front, causing some more marine casualties.
Cue dramatic music

Turn 5
I advanced my Piranha and Devilfish, dropping off drones and troops to contest objectives, The terminators lived up to their reputation as they shrugged off fire from the Firewarrior and Pathfinder teams, the Kroot Auxillaries, Commander Bold Spear AND the Hammerhead while taking a single casualty. When assaulted, a Firewarrior somehow killed the Terminator Sergeant, while the rest eliminated the squad. Remarkably, the drone contesting my opponent's objective survived the assault against a space marine sergeant and captain. The other objective was contested by my Piranha's drones, while the Pirahna exploded from a marine rocket. The game ended at turn 5, with a win for me, holding a single objective. I also achieved my secret objective, since Commander Bold Spear survived. Until next tourney!
They came from.....behind!

Gone Fishin'

This Drone deserves a promotion

Tuesday, April 6, 2010
Tourney Update
Well, the 750 pt tourney is winding down and my last game is scheduled for this Sunday. A matchup against marines! It should be interesting, I only have one unit effective at breaching heavy armour and I have Terminators to face. I suppose I may have to throw some of my fusion blaster and railgun fire in that direction if no better target presents itself. Worst case scenario I'll try going for volume of fire!
I've got my 1000 pt list pretty much locked in. Barring some play-testing I have a really good feeling about my list. It suits my playstyle and adds some things that the 750 pt list was missing. Still wish I could add more, but I'll make do. I'll post it shortly! Along with some battle reports.
I've got my 1000 pt list pretty much locked in. Barring some play-testing I have a really good feeling about my list. It suits my playstyle and adds some things that the 750 pt list was missing. Still wish I could add more, but I'll make do. I'll post it shortly! Along with some battle reports.
Monday, March 29, 2010
Not so Weekly Hobby
So I haven't been updating weekly of late, my apologies. It turns out that working evenings whilst planning lessons for Grade 3's isn't helpful to making hobby happen.
I did get in my Round 2 game as well. I'll give brief synopsis. Do not expect a battle report with pictures this time because, sadly, I forgot my camera. Instead I'll treat you to some short fiction instead, when I get to it.
I played against an Eldar opponent running three transports in an annihilation game. In such a small point game (750 pts), there wasn't much to score me kill points, nor was I equipped to deal with that much armour. That being said, it was a close game. I played hard and aggressive. I infiltrated Kroot, deep striked battlesuits on rear armour, and sucked a wave serpent into being encircled and locked down. I had some poor luck with two of my vehicles both getting blown to pieces the first time they got hit and no matter how many times I hit his vehicles, the best I managed to get on the damage table was 4 or lower, though one of my suits did claim a transport.
Overall, I'm pleased with how the game went. Sometimes it comes down to dice, and usually that happens in a close match.
Best moment: A pair of deepstriked suits backed up by Kroot playing havok in my opponent's deployment zone. I really enjoyed being able to get so much on the other side of the table. I think I'll add some stealth suit squads to back up my infiltrated Kroot for my 1000 point list.
Worst (and best) moment: A grounded wave-serpent shrugging off everything thrown at it, despite the sheer volume of shots breaching its armour.
Saturday, March 13, 2010
Battle Missions!
Picked up the Battle Missions expansion book and I'm quite pleased. After the hubbub around it containing mostly race specific missions, each of them are more than playable than other races. In fact, they acknowledge in the book itself that this is expected. Some race specific missions even give certain rules/modifications that give the stand in force some consideration. There are a lot of missions that bear similarities to each other, but that's just fine. What I like about this is that there are a plethora of really innovative deployments and victory conditions. I'm pumped to try some out.
Overall - I'm pleased
Tourney Update
The first round of our tourney is done and we're in the second leg of it now. The Orks come out on top, followed by Guard and Eldar. The losing factions are headed up by the Tau and the two Space Marine armies. I'm going up against a mechanized Eldar list in my next bout, which should prove challenging for me since it is an Annihilation game. I'm still not sure how I'm going to crack the vehicles. I'm debating on how to use reserves, how to outmanouver and so on. Report on that as soon as it happens.
I didn't post up a "Best and Worst" moment from my last game as is customary. I'll make up for that now.
Best moment: Causing my opponent's heavy weapons team to fall back in the first turn set his nerves on edge for the rest of the game. Terrific.
Worst moment: My Kroot breaking and running off the table. Unreliable auxillaries!
Tuesday, March 9, 2010
Battle Report - Game 1, 750 pts
Here's a rundown of my first game in our tourney.
I was playing my Tau (naturally) against an Imperial Guard army. I can post up our lists if there is some interest.
We set up the table together, rolled our secret objectives (I got annihilate! This meant I got extra points if I killed off half of my opponent's army point value by the end of the game), rolled for deployment type and who went first.
The game was capture and control, with the dawn of war deployment type (I hate dawn of war).
I won the roll off, but decided to let my opponent go first.
- Table Setup

Turn 1
My opponent chose the side of the table with the large ruin and deployed all of his foot troops in it. The objective was placed at the rear of the ruin. Inside the ruin was a heavy weapons squad with missile launchers up top, two 10 man guard squads and his two command squads. He chose to hold his chimera with vets in reserve and outflank his scout sentinel. I chose to make the game aggressive and placed my objectives in the woods across from the ruin. I figured Kroot going to ground in forest with a 2+ save would soak up a lot of fire. Aggressive, but I had fun with it.
Turn 1 was fairly uneventful, my opponent's Leman Russ and Heavy mortar rolled in from the table edge. My Kroot were shot at, but went to ground and made their saves. In retaliation my Commander jumped out of cover and shot up his heavy weapons squad, killing one of them and causing them to flee. My Devilfish moved up and deployed my pathfinders, the fire warriors moved onto the table and took up firing positions while my Hammerhead found a good field of fire. I moved flat out with my Pirahna up the right flank to target enemy armour the following turn.
- The table at the end of Turn 1

Turn 2
My opponent's heavy weapon squad rallied, albiet a level lower than where they started. Unfortunately the ruins proved to help my opponent in this regard as they had to run down through the floors, giving them more time to regroup before leaving the table. The scout sentinel came in on my far flank, while his chimera came in from reserves ready to drive up my right flank. The guard's shooting phase was unimpressive other than a lucky shot on my Pirahna. The Kroot weathered another salvo, and his big guns were off the mark. However, a single krak grenade from a guard grenade launcher blew up my Pirahna. An impressive shot! My opponent needed to roll a 6 to penetrate, on a single die and I had to fail a 4+ cover save. Both of which happened. During my turn my pathfinders stripped the cover from the guard while my Commander and Firewarriors shot up the ruin with my Devilfish moving up to support. I caused casualties, but the guard didn't break this time. My Monat Firestorm played cat and mouse with the scout walker, but rolled poorly on penetration with its missile pods. Similarly, my Hammerhead connected with my opponent's mortar, but rolled a 1 to penetrate vs. armour 12.
Poor luck, but things are still looking very good for me.
R.I.P. brave Pirahna

The view at the end of Turn 2

Perspective from my side of the table

Turn 3
Things started going sour for me in turn 3. The guard shuffled around in the ruin, their chimera moved up and popped smoke, and a squad of guardsmen began advancing on my forest. Only the Kroot took casualties in the shooting phase, failing an impressive 4 out of 6 saving throws. (Which meant I threw 4 ones on the dice). They failed their morale check and fled the table. During my turn I retaliated. No marker lights found their mark and I once again rolled 1's on my penetration with both my Railgun and the missile pods. My other guns thinned out yet more guardsmen.
Table mid turn 3.
The trees on the chimera represent smoke I don't seem to have a picture of the end of turn 3, but I moved up my Devilfish to deal with the advancing troops. Risky, but I'm running out of options.

Turn 4
The guardsmen in the ruin move to hold their objective, while their forces advance. The lone heavy weapons squadsmen take down my devilfish with a single missile, and the mortar wipes out all but one of the Firewarriors inside, who promptly breaks and runs. The Leman Russ' battle cannon takes a pathfinder out as well as my Monat Firestorm, who fails his cover save. My remaining squad of Fire Warriors takes 3 casualties, but hold the line. On my turn I move my drones up to harass his advancing squad, while my Hammerhead fires its submunition template into the guard squad holding the objective while having the pathfinders strip their cover. They fail their moral test and retreat. My remaining fire warriors move up and thin out his advancing guard squad. It's still anyone's game, though I've taken a tremendous hit in the past two turns.
End of Turn 4.

I'm still having fun

Turn 5
My opponent's fleeing squad rallies. He moves his chimera up and the flamer takes care of the rest of my Fire Warriors, his three guard squad assault my drones, finishing them off while his other weapons pepper my Commander and Pathfinders to little effect. On my turn my commander finishes off the guard squad in the open and returns to the objective to at least contest it. My Pathfinders and Hammerhead hit his troop holding his objective once more, but they fail to break again.
We roll to see if the game ends and it does, at turn 5. A victory for my opponent.
A close game! One of the best I played. Tactically, the only thing I did poorly in my estimation was give him first turn, but I had little experience with ruins and didn't think it would give him such a large advantage. I think luck played a large part as well. Having rolled poorly on my Kroot's "terminator" saves, failing every morale check I took, having my Railgun be ineffective and losing the Pirahna were all unexpected. Curse the dice gods!
If I'd change anything, it would be the way I deployed. It would have been safer to put my objective in the other table corner and use my superior range to my advantage. Still, I enjoyed the slugfest.
Turn 5 - End Game

My Objective

His Objective

That's all for now. Until the next game!
Sunday, March 7, 2010
Clash!
Well, my first game of the tourney was over, and it was a doozy! A real nailbiter on both sides, a close match to the end, but in the end my honorable opponent won in one of the best games of 40k I've played. It really could have gone either way! I'll post up a report, pictures and a turn by turn description soon enough, but I'll just leave a picture to tantalize.
- This isn't quite how it looked, but the armies were up for a dramatic photo-op post game.

- This isn't quite how it looked, but the armies were up for a dramatic photo-op post game.

Thursday, March 4, 2010
Hobby Update

Been a while since I posted, so I figured I'd give a bit of an update.
My first tourney game will be happening this Sunday, so expect some sort of battle report and pictures! Completion wise, my army is, well, just about done. I'm now getting concerned about having everything I want done come game time :). With only a few days left I need to finish up my Hammerhead. I'd also like to finish up a few of my bases to squeeze an extra point out. I should have a picture up of the whole 750 pt army when I'm done, so keep checking for updates!
Here's some pictures of the vehicles I've done so far. Pardon my photography skills. My camara can never figure out what to focus on, but I did my best.
Piranha

Pathfinder Devilfish


Firewarrior Devilfish


In Progress Hammerhead

Subscribe to:
Posts (Atom)